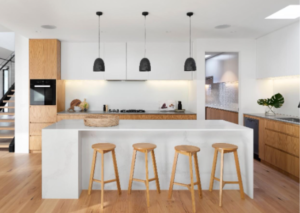
This is a great easy project to take on over a weekend, as it will not take longer than 2 days to complete, assuming your kitchen is about 10 square meters.
Let’s face it, we would all love to have a full kitchen remodel, but this could be a bit on the expensive side and not fit your budget at all.
Financially it would be simpler to consider a more cost-effective alternative, like painting the kitchen, you will be surprised how a simple coat of paint can freshen things up again. As most of your kitchen’s wall space is consumed by wall cabinets, sinks, and backsplashes, you have far less square footage to deal with, than if you were painting your lounge or dining room.
The smaller paintable areas will usually need extensive cleaning and preparation work, but products like degreasing cleaners and a good primer will speed things up to help you get the walls into shape for painting.
Tools That You Will Need
1 Paintbrush, 60mm Wide
1 Roller Frame
3 Roller Covers
1 Paint Tray
3 Paint Tray Liners
2 Drop Sheets
1 Dust Mask
4 Microfiber Cloths
Materials Required
10 Liters Interior Acrylic-Latex Paint, Satin or Eggshell
5 Liters Primer
4 Rolls of Masking Tape
1 Roll Painter’s Tape
A Good Cleaning Agent (Powafix Liquid Sugar Soap or Alternative)
Let’s Get Started
Determine the Area You Will Be Painting
Figure out the square footage of your walls so you know how much paint to buy. We have put a materials list together based on the assumption that your kitchen is 10 square meters in size, so you can just adjust the amounts accordingly. Calculate the square footage of each wall by multiplying room height (likely 8 feet/ 2.4 meters) by the room length (variable). Then add up all the walls to get the total.
Great, now let’s start with preparations.
Mask and Cover the Kitchen for Protection
Lay the drop cloth on the floor and drape large objects such as cabinets, appliances, and tables with plastic sheeting and masking tape, then apply the painter’s tape to the trim before painting the walls.
Fun Fact: What is the difference between masking tape and painters’ tape? Painters’ tape has a cleaner removal after the job is done, while masking tape tends to leave residue behind if left up for the duration of a paint project.
Choosing Your Kitchen Paint
Kitchens are the hub of the home for many families so it is important that the room has a warm feeling, and you can do this with the use of colour. A great place to start is by choosing colours that evoke comfort and align with the idea of food and eating.
The best kitchen colours tend to have a high visual impact, satin and semi-gloss tend to be the most popular paint finish for the kitchen, while matte is rarely recommended because it is difficult to clean, and moisture caused by steam will cause streaks.
Preparation
Painting the kitchen begins with completing the first three steps that we have just covered, choosing the right paint, figuring out how much you need, and covering all surfaces to prepare the room.
Clean All Surfaces to Be Painted
Kitchens tend to build up grease in certain areas, so we highly recommend that you thoroughly clean the walls, above and around the stove, oven, and counters with a good degreaser prior to priming.
You can use the microfiber cloths or a vacuum cleaner to remove dust and cobwebs from the tops of baseboards and other trim.
Let’s Start Painting
If the kitchen has already been painted and the paint is still in a good, clean condition, it will most likely not need priming.
Pour a small amount of paint in the tray, soak the roller, then roll the large spaces of the wall in a W-pattern, bringing the roller to about an inch or two of the painter’s tape. Use the roller on the large expanses of wall and the brush for the little strips, between the backsplash and the cabinets.
Let the paint dry for about two hours, then manually paint the areas that the roller could not reach with the paintbrush.
Note: Unpainted drywall, bare wood, and painted surfaces in poor condition should always be primed.
Apply Additional Coats
Let the paint dry for at least a couple of hours, then re-roll and re-brush the next coat, paint colours deepen and reach their full depth when applied in two or three coats.
Wrapping Up
How easy was that? I am sure you are very proud of your efforts; nothing matches the updated sparkle of a low cost kitchen paint job.

There are many other inexpensive ways that could make a huge impact on your kitchen, like lighting and window coverings. A kitchen should be well lit with natural light during the day and have good work lighting for the evening, this creates warmth and ambiance. For a modern look you might consider ditching the old curtains and replacing them with blinds, this will let light in while keeping the option of privacy at night. For your convenience all the products and materials are available from the Build it Gansbaai store, please feel free to ask any of our experienced salespeople for assistance or advice when purchasing a product, we are here to make your shopping experience as memorable as possible.
Build it Gansbaai offers local delivery, supplying the greater Overberg area with building materials, do-it-yourself home improvement tools, and expert advice.
Please follow us on social media to stay up to date with our latest sizzling specials and promotional offers! Or log on to our online store and shop from the comfort of your home: www.buildit-store.co.za
Build it Gansbaai offers added value services in respect of hardware retailing; embracing all activity within the building materials industry, focusing specifically on the building of; urban, township, rural housing as well as all home improvements and do it yourself.


