Categories
How To

Mastering the Art of Resin-Infused Woodworking: A Comprehensive Guide

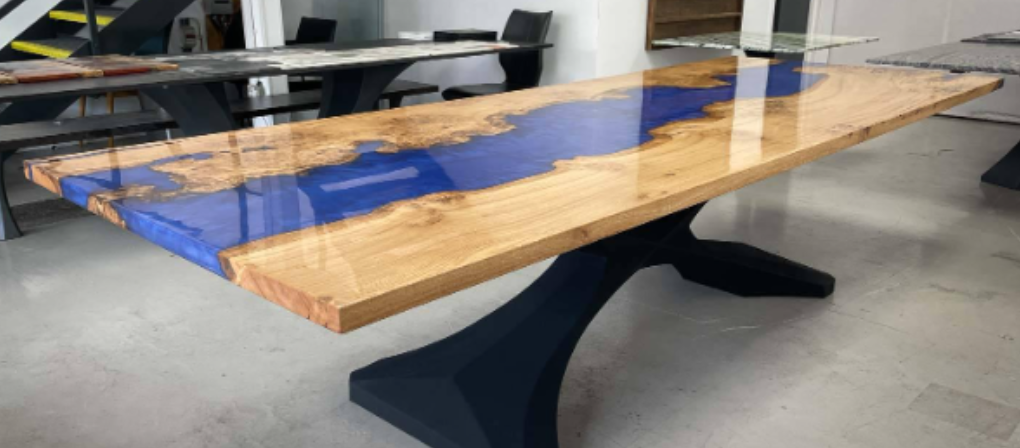
For woodworking enthusiasts seeking to push the boundaries of their craft, the integration of resin has emerged as a transformative technique, adding a unique blend of aesthetics, durability, and versatility to wooden creations. 

In this extensive guide, we will explore the remarkable potential of incorporating resin into woodworking, providing valuable insights and detailed tips to assist you in creating truly remarkable resin-infused masterpieces.

Understanding Resin and Its Characteristics

Resin, whether synthetic or natural, stands as a versatile material that can be poured, moulded, or shaped to produce diverse finishes and effects.  Epoxy resin, in particular, is widely favoured in woodworking for its robustness, transparency, and strong adhesion to wood, making it an ideal choice for creating stunning, long-lasting projects.

Selecting the Appropriate Resin

The success of any woodworking project with resin hinges on the careful selection of the right resin. Opt for epoxy resin specifically formulated for woodworking applications, ensuring optimal bonding strength and longevity. Consider crucial factors such as curing time, clarity, and UV resistance to make an informed choice that aligns with the unique requirements of your project.

Prepping the Wooden Surface

Achieving a flawless resin finish begins with proper preparation of the wooden surface. Thoroughly sand the wood to create an even surface, eliminating any dust or debris that could compromise the final result. 

The application of a sealant or primer is essential to prevent the formation of air bubbles during the resin pour, ensuring a smooth and professional finish.

Crafting Designs and Patterns

Resin infusion opens up endless possibilities for infusing creativity into woodworking ventures. Experiment with an array of designs, hues, and patterns by blending pigments or incorporating metallic powders into the resin, creating a personalized palette that transforms each project into a unique work of art. 

The interplay of colours, the fluidity of patterns, and the shimmering effects of metallic powders offer woodworkers a vast playground to explore, encouraging them to push the boundaries of traditional craftsmanship and forge pieces that resonate with individuality and innovation.

Whether aiming for a sleek modern aesthetic or a rustic, nature-inspired finish, the versatility of resin allows artisans to breathe life into their creative visions, making each project a reflection of their distinctive style and the limitless possibilities that resin infusion brings to the world of woodworking.

Incorporating resin into woodworking isn’t just a technique; it’s a journey into a realm of unlimited artistic expression. The fusion of wood and resin creates a symbiotic relationship, resulting in pieces that not only exude beauty but also stand the test of time.

As you embark on this creative journey, remember that experimentation is key. Each project offers an opportunity to refine your skills, discover new possibilities, and push the boundaries of conventional woodworking.

At Build it Gansbaai, we understand the importance of providing enthusiasts like you with the tools and materials needed to bring your visions to life. Our selection of high-quality woodworking supplies, including premium epoxy resins and a variety of wood options, ensures that you have everything you need for your resin-infused projects. 

Whether you’re a seasoned artisan or a novice eager to explore the world of resin-infused woodworking, our dedicated team is here to support your endeavours. As you dive into the world of resin-infused woodworking, share your creations with the community. Social media platforms and online forums are excellent places to connect with fellow artisans, exchange ideas, and showcase your unique projects. 

Your experiences can inspire others to embrace this innovative technique and contribute to the ever-evolving landscape of woodworking.

In conclusion, resin-infused woodworking is more than a trend; it’s a testament to the limitless potential of human creativity. With the right materials, careful planning, and a passion for innovation, you can elevate your woodworking projects to new heights. 

Unleash your imagination, explore the captivating world of resin infusion, and let your creations tell a story of craftsmanship, artistry, and the seamless integration of nature’s elements.

As you embark on your resin-infused woodworking endeavours, remember that Build it Gansbaai is here to be your trusted partner in realizing your creative visions. Happy crafting! 

Pop into your local Build it Gansbaai today, for building materials, do-it-yourself home improvement tools, and expert advice. Or log on to our online store, and shop from the comfort of your home: www.buildit-store.co.za

Follow us on social media, to stay up to date with our latest sizzling specials and promotional offers! Build it Gansbaai/Hermanus offers added value services in respect of hardware retailing; embracing all activity within the building materials industry, focusing specifically on the building of; urban, township, rural housing as well as all home improvements and do it yourself.

 

Categories
Tips & Tricks

Mastering Garage Organization: Tips and Tricks from Build it Gansbaai

The garage, once merely a space to shelter your vehicle, has evolved into a versatile area with endless possibilities. It can serve as storage, a home gym, an office, a workshop, or even a flatlet. Learn more here about garage organization.

Regardless of its purpose, maintaining an organized garage is essential to fully maximize its potential. In this comprehensive guide, we’ll provide you with valuable insights on how to keep your garage orderly, ensuring that you make the most of this valuable space.

Defining Your Garage’s Purpose:

Before diving into garage organization, it’s crucial to define its intended use. Understanding how you plan to utilize the space will guide your organization efforts and help you choose the right shelves, cupboards, and facilities to optimize its functionality.

Prioritizing Storage:

Effective storage is the cornerstone of a well-organized garage. It ensures that your vehicle fits comfortably while leaving ample room for other activities. Here are some storage solutions to consider:

Vertical Wall-Mounted Shelves: Installing shelves on your garage walls allows for efficient visibility and quick access to items. It’s an ideal solution for items you frequently use.

Drawers, Cabinets, and Cupboards: If you prefer a more minimalist look and wish to keep certain items out of sight, consider drawers, cabinets, and cupboards. They provide a clean and organized appearance.

Creative Containers: Get inventive with storage by repurposing items like old coffee cans or jars to store small items such as screws, nuts, and bolts.

Hooks and Brackets: To optimize floor space and movement, use hooks and brackets. Attach them to walls or hang them from ceilings to store items like gardening equipment or bicycles.

Zoning Your Garage:

Dividing your garage into zones for specific purposes can drastically enhance its organization. Here are some zone ideas:

Home Maintenance Zone: 

Store power tools, paints, and other home maintenance essentials in this area for quick and easy access.

Gardening Section: 

Designate a section for gardening equipment, including your lawn mower, and gardening tools. Keep everything neatly organized for a stress-free gardening experience.

By zoning your garage, you not only maintain tidiness but also ensure that you can locate specific items when needed. 

Everything finds its place, making your garage a well-structured and functional space.

Explore Build it Gansbaai’s Storage Solutions:

At Build it Gansbaai, we offer an extensive range of storage options designed to meet your unique needs. Whether you’re looking for vertical shelves, drawers, cabinets, hooks, or brackets, our expert staff is here to assist you. 

We’ll provide guidance on selecting the right products to enhance your garage’s organization.

Share Your Success:

We’d love to see the results of your organized garage! Share photos of your newly arranged space in the comments section below. Your transformation can inspire others to take control of their garage clutter and turn it into a well-organized haven.

Plan Your Next DIY Project:

If you’re ready to tackle your next DIY project, Build it Gansbaai is your trusted partner. Our wide range of building supplies and tools, combined with expert advice, ensures that you get the job done right the first time. 

Incorporate these garage organization tips and tools from Build it Gansbaai to transform your garage into a functional and clutter-free space. With the right approach and the right supplies, you can make the most of this valuable area in your home.

Visit our store or explore our online shop from the comfort of your home, www.buildit-store.co.za to plan your next DIY adventure.

Please follow us on social media to stay up to date with our latest sizzling specials and promotional offers!

Build it Gansbaai offers added value services in respect of hardware retailing; embracing all activity within the building materials industry, focusing specifically on the building of; urban, township, rural housing as well as all home improvements and do it yourself.

Build it is a division of the SPAR Group Limited South Africa. A voluntary trading group of individually owned retail stores with more than 10 000 employees across the group, we currently have stores in South Africa, Namibia, Swaziland, Lesotho and Mozambique with plans to expand into Botswana and Zambia in the near future. We view ourselves not only as a supplier of materials, but as a partner to our valued customers in accomplishing their building or renovating projects.

Categories
How To

Swing into Fun, How to Build a Wooden Rope Garden Swing for Kids!

Get ready to bring endless joy and excitement to your backyard with a charming DIY project that’s perfect for kids—a wooden rope garden swing! 

In this step-by-step guide, we’ll show you how to create a swing that will have your little ones soaring through the air while creating unforgettable memories. So, grab your tools, unleash your inner DIY hero, and let’s get swinging!

Materials Needed:

2 sturdy wooden planks (8 feet long, 2 inches thick)

  • Rope (strong and weather-resistant)
  • Drill
  • Wood screws
  • Saw
  • Sandpaper
  • Measuring tape
  • Pencil
  • Safety goggles (to protect those peepers!)

Creative imagination (because swings are all about fun!)

Step 1: Measure and Cut the Wooden Planks

To start off, measure and mark the desired length for the seat of your swing on the wooden planks. We recommend a length of around 3 feet. 

Use your trusty saw to make clean, even cuts along the marked lines. Smooth out any rough edges with sandpaper to ensure a splinter-free swinging experience.

Step 2: Drill the Rope Holes

Next, it’s time to create the holes for the ropes. Measure approximately 1 inch from each end of the wooden planks and mark the spots. These will be the points where the ropes attach to the swing. 

Put on those safety goggles and use a drill bit that matches the diameter of your rope to drill holes at the marked spots. Be sure to drill straight through the planks to ensure a secure attachment.

Step 3: Thread the Rope

Take your sturdy and weather-resistant rope and cut two equal-length pieces, around 10 feet each (adjust the length based on your desired swing height). Thread one end of each rope through the holes on one wooden plank, making sure they are securely fastened. Tie knots at the ends of the ropes to prevent them from slipping back through the holes.

Step 4: Hang the Swing

Now comes the fun part—hanging the swing! Find a sturdy and safe spot in your garden or backyard to anchor the swing. It could be a sturdy tree branch, a sturdy frame, or even a dedicated swing set. 

Make sure the structure you choose is capable of supporting the weight of the swing and the little adventurers who will be using it.

Step 5: Attach the Other End of the Rope

Once you’ve found the perfect spot, thread the free ends of the ropes through the holes on the other wooden plank. Adjust the height of the swing by tying knots at the desired length. Make sure the knots are secure and won’t come undone during playtime.

Step 6: Safety First!

Before you let the kids hop on the swing, double-check that everything is safe and secure. Give the swing a gentle push to ensure it can handle the weight and movement without any issues. Inspect the ropes, knots, and wooden planks to ensure they are in good condition.

Step 7: Let the Swinging Begin!

It’s time to let the little ones unleash their energy and swing to their heart’s content! Encourage them to have fun, reach for the sky, and enjoy the thrill of flying through the air. Remember, adult supervision is always important during playtime.

Congratulations, you’ve successfully built a wooden rope garden swing that will provide endless entertainment for your kids! 

With just a few simple materials and a dash of DIY enthusiasm, you’ve created a fantastic addition to your backyard that will bring smiles and laughter for years to come. So go ahead, sit back, and watch as your children create cherished memories swinging into fun!

Please send us a photo of your completed project, we would love to see it, you can upload your images in the comments section!

All the tools and materials used in this article are available instore from Build it Gansbaai, for building materials, do-it-yourself home improvement tools, and expert advice. Or log on to our online store and shop from the comfort of your home: www.buildit-store.co.za

Build it Hermanus offers added value services in respect of hardware retailing; embracing all activity within the building materials industry, focusing specifically on the building of; urban, township, rural housing as well as all home improvements and do it yourself.
Categories
Decking Do It Yourself

Revamp Your Outdoor Space with Build it Gansbaai: Exploring Patio and Decking Materials

Revamping your outdoor space has never been more exciting! At Build it Gansbaai, we understand the importance of creating a beautiful and functional outdoor area that reflects your style and enhances your lifestyle. Whether you’re looking to relax, entertain, or simply enjoy the fresh air, choosing the right patio and decking materials is crucial. In this article, we will explore different materials suitable for patios and decking, discussing their benefits, maintenance requirements, and design ideas.

Wood Decking

Wood decking is a popular choice for its natural beauty and timeless appeal. At Build it Gansbaai, we offer a wide range of hardwood options, including teak, cedar, and redwood. These hardwoods are known for their durability and resistance to rot and decay, ensuring long-lasting outdoor flooring. With regular maintenance such as sealing and staining, our high-quality wood decking can withstand the elements and provide a warm and inviting atmosphere for your outdoor space.

Composite Decking

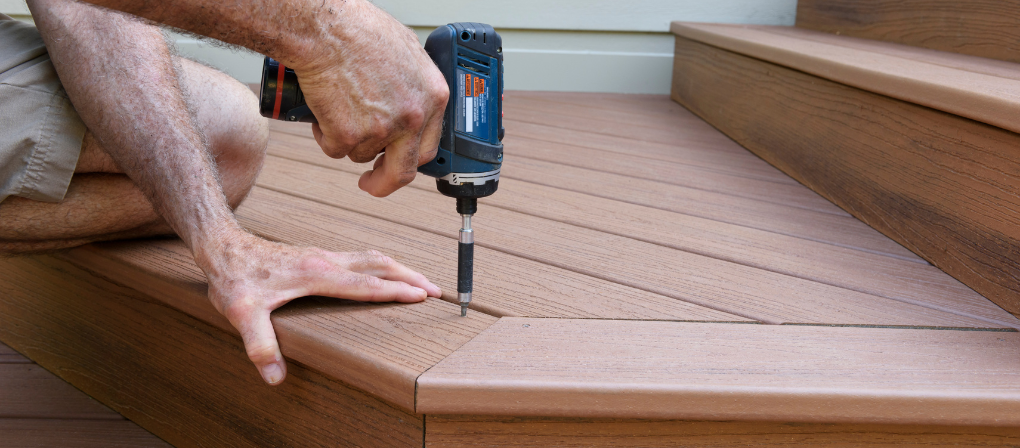
If you prefer a low-maintenance option without compromising on aesthetics, our composite decking materials are an excellent choice. Build it Gansbaai offers composite decking options that mimic the look of real wood while providing superior durability and resistance to fading, staining, and mold growth. With composite decking, you can enjoy the beauty of a wood-like finish without the need for regular sealing or staining. It’s the perfect solution for busy homeowners who want to spend more time enjoying their outdoor space.

Concrete Pavers

Build it Gansbaai offers a wide selection of concrete pavers, allowing you to create a stunning patio or deck that suits your style. Concrete pavers are durable, versatile, and cost-effective. With various shapes, sizes, and textures available, you can unleash your creativity and design a unique outdoor space. Concrete pavers are known for their ability to withstand harsh weather conditions, making them a practical choice for coastal areas like Gansbaai. With proper maintenance, your concrete paver patio or deck will provide years of enjoyment.

Natural Stone

For those seeking a touch of luxury and elegance, natural stone is an excellent option. At Build it Gansbaai, we offer a selection of high-quality natural stone materials such as limestone, slate, and travertine. Natural stone adds a unique charm to your outdoor space, creating a sophisticated and inviting atmosphere. With proper sealing and maintenance, natural stone patios and decks can withstand the elements and retain their beauty for years to come.

Now, let’s explore some design ideas to inspire your outdoor space transformation with Build it Gansbaai:

  • Create a cozy retreat with a wood deck adorned with comfortable outdoor furniture, a built-in fire pit, and soft lighting for warm evenings under the stars.
  • Opt for composite decking in a modern gray tone, complemented by sleek outdoor furnishings and vibrant planters to create a contemporary and stylish outdoor living area.
  • Design a beautiful patio using concrete pavers in various sizes and patterns, accentuated with a pergola, comfortable seating, and decorative elements to establish a welcoming and relaxing ambiance.
  • Achieve an elegant and luxurious atmosphere with a natural stone patio, featuring a cozy lounge area, a water feature, and lush greenery for a tranquil outdoor sanctuary.

At Build it Gansbaai, we are committed to providing high-quality patio and decking materials to revamp your outdoor space. Visit our store today and let our knowledgeable team assist you in choosing the perfect materials to create your dream outdoor oasis.

Categories
How To

How to Build a Charming Indoor General-Purpose Table Out of Pine Wood Step by Step

Building a charming indoor general-purpose table out of Pine Wood can be a great DIY project for those who enjoy woodworking, as it not only allows you to flex your creative muscles, but also provides a functional and practical addition to your home decor, whether it’s for working, dining, or socializing.

Today we will be Building a 2-meter wide, 4-meter long, and 1-meter-high table made of pine wood. To begin, you’ll need to gather all the necessary tools and materials. By following these steps, you can create a beautiful and functional table that will add warmth and character to any room in your home.

Materials:

  • 6 pine wood boards (2m x 0.2m x 0.02m)
  • 4 pine wood boards (4m x 0.2m x 0.02m)
  • 4 pine wood boards (2m x 0.2m x 0.02m)
  • 4 wooden legs (1m x 0.1m x 0.1m)
  • Screws
  • Wood glue
  • Sandpaper
  • Stain or paint (optional)

Tools:

  • Measuring tape
  • Circular saw or handsaw
  • Drill
  • Screwdriver
  • Clamps
  • Sanding block or electric sander
  • Paintbrush (if using stain or paint)

Step 1: Cut the Boards

Using a measuring tape, mark and cut the six 2-meter boards into 4 equal lengths of 0.5 meters each. These will be used as the table’s tabletop planks. 

Then, cut the four 4-meter boards in half to make eight 2-meter-long pieces. These will be used to create the table’s frame. Lastly, cut the four wooden legs to 1 meter in length.

Step 2: Create the Tabletop

Lay the four tabletop planks side by side on a flat surface. Use wood glue to attach them together. Clamp the planks tightly and leave to dry for several hours.

Step 3: Create the Table Frame

Place the four 2-meter-long pieces of wood in a rectangular shape. Attach the corners with screws and wood glue. To make the joints stronger, drill pilot holes before attaching the screws. 

Use the measuring tape to ensure that the rectangle’s dimensions are 2 meters wide by 4 meters long.

Step 4: Attach the Tabletop to the Frame

Place the tabletop on top of the table frame. Use screws and wood glue to attach the tabletop to the frame. Again, drill pilot holes to make the joints stronger.

Step 5: Attach the Legs

Flip the table over and attach the legs to the corners of the frame. Use screws and wood glue to secure them in place. Again, drill pilot holes to make the joints stronger.

Step 6: Sand and Finish the Table

Use sandpaper or an electric sander to smooth out any rough edges and surfaces. Finish the table with a coat of stain or paint, if desired. Allow the stain or paint to dry completely before using the table.

Good Job! Your, 2-meter wide, 4-meter long, and 1-meter-high pine wood table is now complete!

The process of building a pine wood table from scratch involves various steps, from selecting and preparing the wood, to cutting and joining the pieces, to sanding and finishing the surface, all of which require patience, precision, and attention to detail, but can be rewarding and fulfilling for those who appreciate the beauty and value of handmade furniture.

All the tools and materials used in this article are available instore from Build it Gansbaai, for building materials, do-it-yourself home improvement tools, and expert advice.

Please send us a photo of your completed creation, we would love to see it, you can upload your images in the comments section! Follow us on social media, to stay up to date with our latest sizzling specials and promotional offers!

Build it Gansbaai offers added value services in respect of hardware retailing; embracing all activity within the building materials industry, focusing specifically on the building of; urban, township, rural housing as well as all home improvements and do it yourself.

× How can I help you?